If your bathroom ceiling fan needs replacement or you simply just need to get a new one fixed, this process is relatively simple and easy. If you love to work on do it yourself (DIY) projects then great news! All that you require to get the job done are a few of the proper tools and some basic skills in carpentry and electrical.
In this article, we will show you in a step by step process how to replace a bathroom ceiling fan quite simply.
Bathroom ceiling fans are a great addition to any bathroom because they help to eliminate any bad odor and moisture. This, in turn, helps to stop mildew and mold from growing in your bathroom.
They also prevent the paint or wallpaper on your bathroom walls from getting peeled or blistered. They also make sure that windows and doors don’t get warped.
If you don’t happen to have a ceiling fan in your bathroom, then due to the reasons we just listed, you may need to consider getting one.
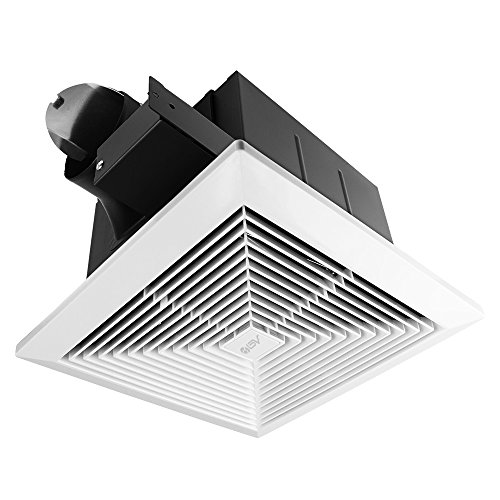
- HIGH-QUALITY FAN: Quiet, energy efficient exhaust fan to help control air quality is powerful enough for rooms (including bathroom) up to 75 sq. ft.
- EFFICIENT: Powerful ventilation reduces humidity to quickly eliminate fogged mirrors and manage moisture, so your vision will always be clear and your surroundings will always be comfortable
- EASY INSTALLATION: Easy to install new/replace existing product with retrofit installations that can be done entirely from the room-side – no attic access required
- RELIABLE PERFORMANCE: With our TrueSeal Damper Technology, InVent fans reduce air leakage by up to 50% compared to competitive models, resulting in better home performance via blower door tests and reducing cold and warm air backdrafts
- GREAT FOR BATHROOM: UL Listed for use over tubs and showers with a GFCI circuit so you can capture the steam before it spreads throughout the room by locating your fan exactly where you need it the most.Rated Amps:0.3
Table of Contents
Tools Needed To Work
1. Drill or driver – preferably cordless.
2. 4-in-1 screwdriver.
3. Drywall saw.
4. Chalk line.
5. Jigsaw.
6. Hammer.
7. Dusk mask.
8. Utility knife.
9. Non-contact voltage tester.
10. Pry bar.
How To Replace A Bathroom Ceiling Fan
Step 1: Plan Out The Strategy You Will Use To Replace The Bathroom Ceiling Fan
This DIY task will involve wiring and electricity so it is advisable that you contact an electrical inspector local to you to enquire if you would require a permit.
Like we mentioned earlier, you don’t need to be highly skilled in electrical and carpentry tasks, all that’s needed is some basic skills. You will need to get your tools ready such as a jigsaw and a power drill.
The simple tasks include sawing using your hand a small opening in the drywall, cutting duct which is aluminum, and driving screws which are metal into ductwork which is aluminum.
You will also have to climb the roof to saw a larger vent opening on the roof and will need to disconnect and reconnect a few wires which are electrical.
If you encounter complicated problems that are beyond you such as electrical wiring that appear complex and duct clearances that are tight, please contact a licensed electrician.
Other complications include water damage located at the vent cap of the roof or a roof pitch which is steep. Again, you would need to hire a licensed electrician if you encounter these problems.
You will need to enter your attic in order to access the roof so make sure you’re adequately protected. Wear protective clothing such as long pants, a shirt with long sleeves, a dust mask, and a hat. This is to ensure you’re protected from insulation and dust which you normally find in attics.
When working on the roof, be sure to use the brackets of the roof or cleats or a harness for safety. This is to ensure your feet are properly secured and you’re in less danger of falling.
If the roof is very steep and you’re not feeling 100% safe while there, then please get professional help at this stage.
If your house does not have attic access, this means you will need to carry out the entire process from below. You will need to cut your ceiling up a little bit and get it patched afterward, so that you can install the fan and run ductwork to the vent cap of the wall.

Step 2: Take The Old Ceiling Fan Out
First, before you begin, you will need to turn the electricity off which leads to the ceiling fan. This can be done through the main panel. While the ceiling fan is working, loosen the fuses or flip the circuit breakers till the fan stops.
Ensure your safety goggles are on at this point. Now while you snap off and pull down the old grille, be careful of the debris. Don’t be too surprised at the amount of dirt that would fall out as you do this.
Now, disconnect the motor and get it removed from the housing. The motor is normally held in place using screws or clips so make sure you’re wearing safety gloves. Also, watch out for sharp edges while you do this.
The electrical connections in nature are normally located in a tiny splice box. Using a voltage tester, inspect the wires for power in order to ensure it’s completely off. Now you can disconnect the wires.
The next step is to head to the attic. At this point, you will require a work light, screwdriver, metal snips, power drill, wire stripper, utility knife, and a wire cutter.
To prevent going up and down too many times, you can take every tool you require to work using a pail.
To ensure you’re comfortable and it’s easy for you to work while in your attic, you can use a small plywood piece in case you need to lie down or kneel at any point in time. The plywood piece can be roughly 2 x 3 ft.
If you’re carrying this DIY project during summer months, it’s advisable you do so during the morning hours. This is because on summer days, attics become quite hot.
Now, from the housing of the old ceiling fan, you will have to push the insulation back. Once you’ve done this, you can remove the housing. A number of older models are normally mounted directly to a joist.
If you find that it’s difficult to remove the screws, you can use the power drill to make the process easier.

Step 3: Replace The Old Ceiling Fan With The New One Including The Duct
Now you can head down the bathroom again.
Hold the base of the new ceiling fan housing against the ceiling. Then draw out the new opening size. Please note that a lot of the newer and quieter fans are bigger than the old models.
To make the cutting process simpler, line up two of the sides with the hole which already exists. Make sure you’re wearing your safety goggles while you cut.
Cut out a piece of flexible and insulated duct tape which is roughly 18 to 24 inches longer than the previous duct. Now cut out another piece of aluminum ductwork which is 4 inches and another which is 6 inches.
Now you can head back into the attic and take the duct you’ve cut out with you, including the new ceiling fan, its mounting brackets, and an aluminum elbow.
You will also need to take along with you the drywall screws, metal screws, electrical clamp, electrical cable staples, duct clamps, and caulk. You might also require blocking in order to join the joists so you can support the new ceiling fan housing.
At this stage, you will need assistance in order to get the new ceiling fan mounted.
Put the mounting brackets on by sliding it and get them extended to the joists. Get the fan aligned with the new hole in the drywall. Now gently ease it to the person assisting you. He/she will hold the housing flush against the ceiling, in the meantime, you will be getting the brackets screwed to the joists.
After you’ve installed the fan, run the ducts. Now fasten the duct liner to the elbow and the aluminum elbow to the exhaust port.
Now get insulated duct measured and cut. The perfect duct run needs to be as straight as it possibly can and have the least amount of turns. Spread out the duct from the port of the exhaust to the opening of the roof but make sure it’s not stretched too tight. This is to make sure that it doesn’t kink. Now you can complete attaching the insulated duct to the two ends of the aluminum.
In this article, the ceiling fan wiring is completed via the attic while some ceiling fan models are wired from underneath.
In both cases, you will need to clamp the electrical cable to the housing. This can be achieved by using a regular clamp with 6 inches of wire which extends inside the box.
Now, strip 5/8th inches of insulation off each of the wire ends, the get the wires connected. Get the cables stapled to a framing member inside 12 inches of the cable clamp. You might notice that the already-existing electrical cable is too little to get to the new ceiling fan.
In case the cable runs to a junction box which is nearby, you can get it replaced with a longer section. If not, you will need to get a new junction box installed.
If wiring rules are not familiar to you, don’t hesitate to call a licensed electrician to get this part done. Even if you are, it’s still advisable to get your work inspected by a local electrician.
Cover the boundary of the housing of the ceiling fan using flexible caulk. This is important to make sure sound transmissions and air leakage is reduced.
Get the insulation replaced while ensuring the fan housing is covered. Make sure you remove every work tool from the work area.

Step 4: Get The Cap Installed
It’s always advised that you get the work on the roof completed in one round trip. While you carry out work on the roof, you will require a tape measure, a utility knife, a pry bar, a carpenter’s pencil, and roof cement.
You will also need a scrap of the straight aluminum ductwork which has one end cut to match the angle of the roof. You will also need a hammer and a new roof vent cap, ½ inch of Phillips self-tapping sheet metal screws, caulk, metal snips, and a jigsaw.
It’s advisable to wear either an apron or a tool belt to prevent you from moving up and down the ladder to retrieve tools which have the tendency to slide off.
To give you added confidence while working on the roof you can install a pair of roof brackets in addition to a 2 by 10 or 2 by 4 nail cleats to the roof. Install these to the roof just a few feet under the opening of the vent. These will provide you with a more stable area you can put your feet while you get work done on the roof.
Get the previous vent cap replaced with the new vent cap. Carefully do away with the old vent cap in order not to damage the shingles as they tend to be brittle. This is especially true on cold days.
Now expand the old hole which is about 3 inches in order to place the duct which is 4 inches. You can use the duct which is 4 inches as an outline.
This opening normally has an oval shape and it’s in the route of the slope of the roof. Reach through the roof then pull the aluminum duct which is straight up through the hole. Make sure the angled end extends approximately ¾ inches above the surface of the roof.
Screw the duct to the sheathing using a magnetic drill bit to assist you in doing so. Now drive a roofing nail through the duct sides in order to get it anchored temporarily.
Seal the edges round using caulk to prevent condensation from going under the shingles or running down the duct again.
Ensure the damper and the screen in the new vent camp is checked out before you install them and make sure they are both properly in place.
When you finish, fill out any nail holes you created in the roof using roofing cement.
To finish the project, get the decorative grille installed. To make sure the fan is working properly, turn on the power again from its source and turn the ceiling fan on.
The video explains things better:
For more awesome content on ceiling fans, click here to learn how to ground a ceiling fan.